Geometric design stamps and printing
- May 17, 2021
- 2 min read
Updated: Jan 15, 2024
How to create simple designed stamps for easy printing. In 8 easy steps!
In this project I wanted to create geometric, interchangeable stamps so I could mix and match, creating endless design possibilities.
For this project you will need;
Essdee Mastercut block – I used an A4 sheet for all of my blocks
Pencil (and paper/graph paper)
Craft knife and metal ruler
Lino carving tools
Inking stamps or lino printing ink (roller and barren or printing press)
Paper – I printed on a mixture of paper and thin card
This project can take anywhere from 45 minutes to 3 hours, depending on how many blocks you make and how many prints you take.


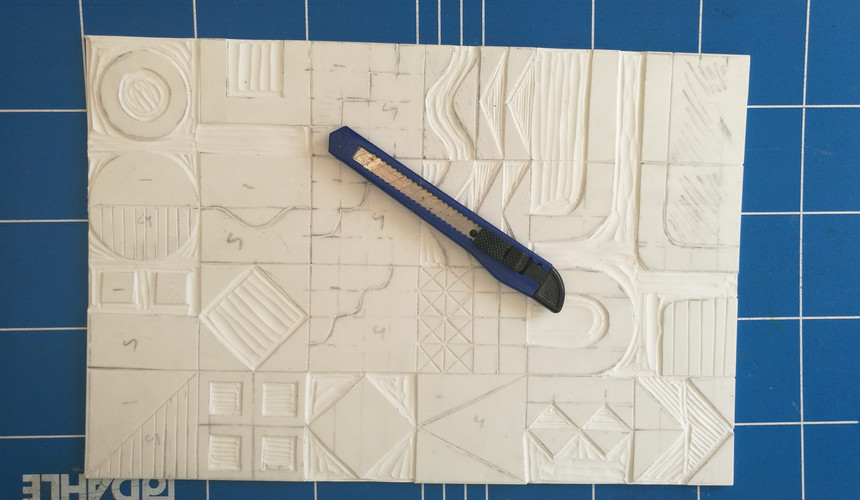
1. I created my design on graph paper as I wanted each block to fit/link to each other.
Each of my blocks are 5 x 5 cm. I also made some block split in half so I could either use the full square or half a block.


2. I then traced the design down on to Essdee 'Mastercut' block.
3. Next, I carved out the negative shapes from the design using my lino cutting tools. Mastercut is quite soft so this was easy to do (you may be able to do this with your craft knife). Be careful not to change your design too much or the shapes won’t link with each other.


4. I then cut my A4 design block into 5 x 5 cm squares using my craft knife and metal ruler. First I cut them into strips, then individual blocks and then carefully separated blocks that had two connecting halves.


5. For printing I first used craft stamp inking pads in various colours.
6. I measured a boarder around my paper and marked the top right corner and edge of my first block. Once this first block was printed, I could then line the other blocks up next to that one, it helped to keep everything straight.


7. I also over printed some blocks with other blocks to build up the design.


8. I then tried printing larger designs using Caligo safe wash relief printing ink. I inked up the whole design with the roller. Then laid it out on a registration board and printed it with my Xcut Xpress craft printing press.
The prints made with the relief printing ink took much longer to dry so I hung those to dry for a few days.
You can buy my final prints via my website.


Comments